Home Page

Monday, April 30, 2007

Pork Chops Stuffed with Barley and Apricot


This is another recipe from one of my most dog-eared cookbooks. The New Dieter's Cookbook from Better Homes and Gardens. One of the reasons I love this recipe is because the pork stays so tender and juicy. I made a few small changes to the original recipe. It called for 2 tbsp of quick cooking barley. I can never find that in my grocery store, so I use regular pearl barley. This means you have to cook it in advance and it took a little trial and error to arrive at the right amount. A half cup of cooked barley is about perfect. To get a half cup of cooked barley, simmer 1/4 cup of barley in 3/4 cup of water for about 30 minutes (taste a bit to make sure its nearly tender). This will result in a little more than the required 1/2 cup, but just save the rest and add it to soup another day. Another change I made was the addition of apricot. The recipe called for "mixed dried fruit" but I liked the idea of just one fruit flavour, and chose apricot. This would also be really good with dried apples, and I'm going to try that sometime. In this picture the chops are served with mashed potatoes and sautéed carrots, baby zucchini and yellow sunbursts.

Pork Chops Stuffed with Barley and Apricot

1/4 cup water
1/2 cup cooked barley
1/4 cup onion, diced
2 tbsp dried apricots, chopped
1/2 tsp lemon zest
1/4 tsp salt
2 tbsp fine dry breadcrumbs
1/4 tsp dried thyme
1/4 tsp pepper
2 cloves garlic, minced
4 boneless pork loin chops (cut 3/4" thick)
2 tbsp orange juice
1 tbsp honey

1. In saucepan mix cooked barley, 1/4 cup water, onion, apricot, lemon zest and salt. Bring to a boil and simmer for 5 minutes. Remove from heat and let stand covered for 5 more minutes.

2. Stir in breadcrumbs, thyme, pepper and garlic.

3. With a sharp knife, cut a deep pocket into each pork chop (almost through to the other side).

4. Divide the stuffing between the chops and fill the pockets. Seal with a metal skewer or toothpick.

5. Mix 2 tbsp orange juice with 1 tbsp honey and set aside.

6. Preheat broiler and spray the rack of a broiler pan with cooking spray. Broil for 6 minutes per side.

6. Paint pork chops with orange juice and honey mixture and broil one more minute per side. Remove skewers prior to serving.

Sunday, April 29, 2007

Potato Pancakes


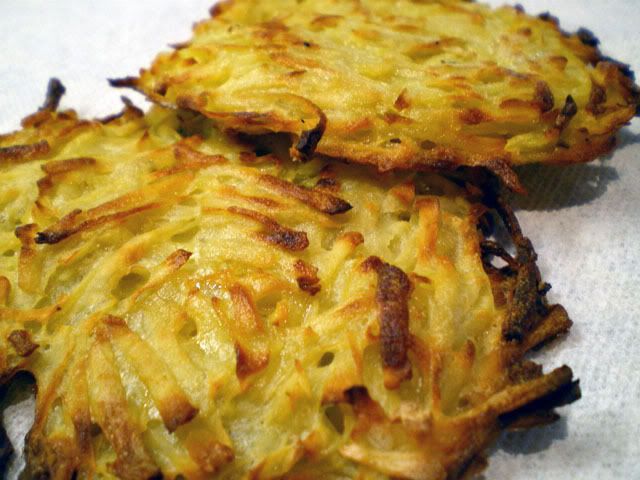
I was just scrolling through my blog and I noticed that the last 4 recipes I posted had rice in them. I wouldn't want anyone to think that's all we eat around here, so to prove it, here is a potato recipe. I love potato pancakes. We often have them on the side if I am making a big "weekend" breakfast. Or, on occasion, I make them as a side dish with dinner. Sometimes I even take them to work for lunch and I eat them cold with light cream cheese and apple sauce on them. For some strange inexplicable reason, my kids don't eat these well. I keep telling them, "they are just like the ones you get at McDonald's for breakfast". Yeah, they ain't buying THAT! Anyway, I am sure it just a phase and if I keep making them, eventually my kids will come around.

Sometimes I add a couple of tablespoons of finely diced onions, which makes them even better but exponentially reduces the odds that my kids might eat them. In the past I have fried these in oil, but lately I've been baking them with a little bit of cooking spray to be healthier. They are nearly as good baked (but let's face it, EVERYTHING is better fried - obviously).

Potato Pancakes

4 medium potatoes, peeled
1 heaping tbsp sour cream
1 tbsp flour
1 egg
salt and pepper

1. Grate potatoes on a cheese grater and squeeze out the excess liquid.

2. Mix with sour cream, flour, egg, and salt and pepper.

3. Either (a) heat a couple of tablespoons of oil in a skillet over medium heat and add potatoes by large spoonfuls. Flatten them out with the back of your spatula and fry until browned on each side, or (b) drop by large spoonfuls onto a cookie sheet sprayed with cooking spray. Flatten them out and bake at 400F for about 10 minutes per side (when I flip them I spray a little more cooking spray underneath each one).

Saturday, April 28, 2007

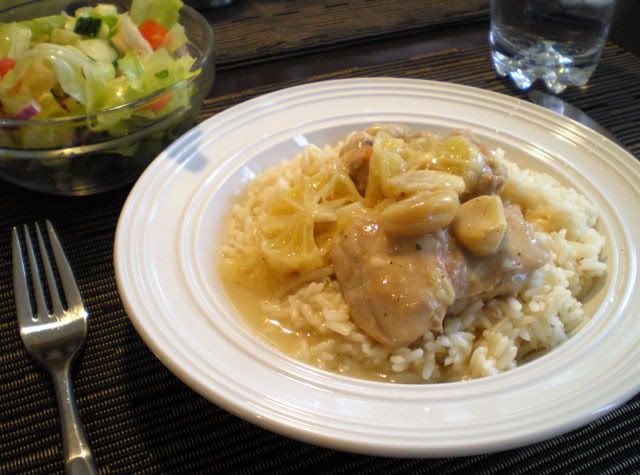
Chicken Thighs with Garlic and Lemon


No, you didn't read the recipe wrong and it isn't a typo. There are twenty cloves of garlic in this meal. Don't let that turn you off, I suffered no ill effects. In fact, after I had dinner I went to the gym and huffed and puffed in my personal trainer's face and she didn't even keel over. My kids picked the garlic cloves out, but that was fine, I was happy to eat the extras.

I have no idea whether Mario really liked this recipe or not, because I didn't ask him. He usually needs to be asked "so, honey, what'd you think?" If I don't ask, I get nothing. Last night I got stubborn and refused to ask, instead I got up and start banging things around while I was doing the dishes. Then I noticed Mario slinking out of the kitchen with that "what on earth did I do wrong this time?" look on his face.... (just read the blog sweetie)

Chicken Thighs with Garlic and Lemon
(serves 4)

8 chicken thighs (I prefer to use boneless and skinless)
2 1/2 cups chicken bouillon
20 garlic cloves, peeled
1 tbsp butter
1 tbsp olive oil
1 lemon, peeled and thinly sliced
3 tbsp flour
2/3 cup white wine
salt and pepper to taste

1. Simmer the garlic cloves in the chicken bouillon, covered for 40 minutes.

2. Heat the butter and oil in a skillet and brown the chicken thighs on all sides. Transfer chicken thighs to a casserole dish.

3. Remove the garlic cloves from the chicken stock and arrange them around the chicken thighs. Add the lemon slices on top.

4. Add the flour to the drippings remaining in the skillet from the chicken and stir, cooking for about 30 seconds. Add the wine, stirring constantly. Add the broth. Bring to a boil and stir until the sauce has thickened. Season with salt and pepper.

5. Cover and bake at 375F for 40 to 45 minutes. Serve over rice or boiled potatoes.

Friday, April 27, 2007

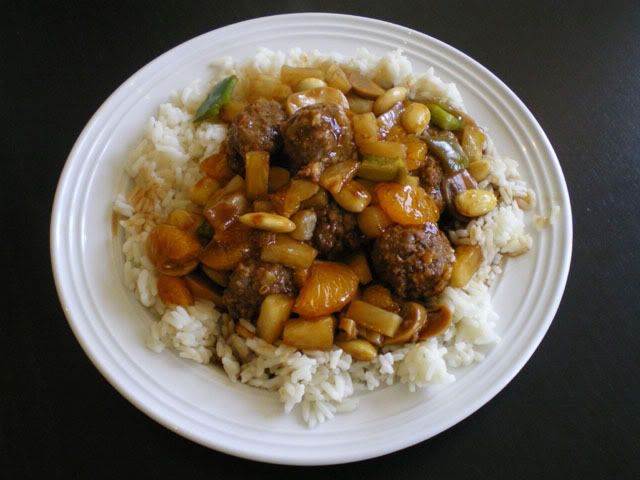
Hawaiian Meatballs


This is an old family favorite of ours. I originally got this recipe from my Mother-in-Law (a source of many of my best recipes). It is quick and tasty. I usually try to keep all the ingredients for this recipe on hand, so I can make it when I can't figure out what else to make. I also sometimes make a whole bunch of the meatballs in advance and freeze them. Then all I have to do is prepare the veggies and the sauce and put the casserole in the oven. I always serve this dish over rice. The kids are OK with this one.... Claire picks out the green pepper and Marco picks out the pineapple, mandarins, green pepper, mushrooms and almonds (that's right- he basically will only eat the meatballs and the rice, but he's only 4 and all that other stuff is just too exotic for him).

Hawaiian Meatballs

Meatballs:
1 lb ground beef, lean
1 tsp salt
1/2 tsp garlic powder
1/2 tsp dried parsley
1/2 tsp pepper
1 tbsp Heinz 57 sauce
1 egg
1/4 cup ketchup
1/2 cup rolled oats.

Remaining Ingredients:
19 oz can pineapple tidbits
1 can mandarin sections
1/4 cup white vinegar
1/4 cup low sodium soy sauce
1/4 cup brown sugar
2 tbsp cornstarch
1 can sliced mushrooms
1 green pepper chopped
1 package blanched almonds

1. For meatballs: Mix all ingredients and shape into 1" balls. Spread on a foil lined cookie sheet and bake at 400F for 10 minutes. Place meatballs in casserole dish that has a cover.

2. For sauce: In a saucepan, mix juice from the pineapples, juice from the mandarins, vinegar, soy sauce, vinegar and cornstarch. Whisk and bring to a boil. Stir until thickened.

3. To the meatballs in the casserole dish, add mushrooms (drain the mushrooms and discard the liquid first), green pepper, pineapple, mandarins and almonds (don't mix just layer it all up).

4. Pour sauce over casserole and bake covered at 350F for 30 minutes. Serve over rice.

Thursday, April 26, 2007

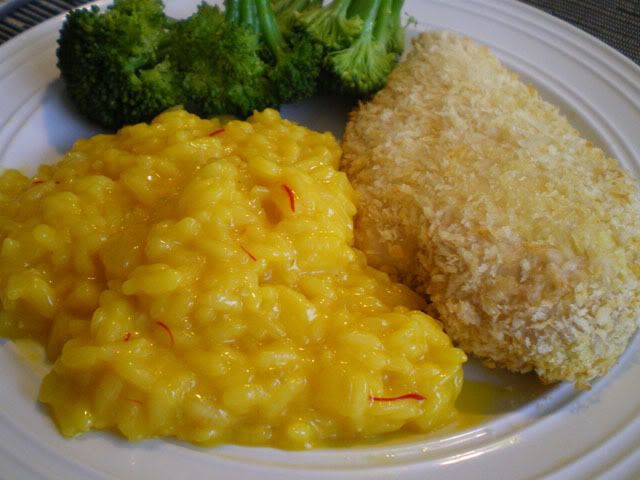
Saffron Risotto


I love saffron. The reason I love saffron probably has something to do with the cost. I am inexplicably attracted to expensive things. The last bottle of saffron I bought was $10, and it contained 1 gram of saffron. About enough to make this recipe twice. It's worth it though.

I also love risotto. People think that risotto is hard to make, but its not. It takes about a half an hour, and you need to pay attention to it, but it is not hard. It is also low in fat, because the creaminess comes from the starch in the rice, not added fats. This entire recipe only has 2 tbsp of butter, and it serves about 6 people as a side dish. For dinner I served the risotto with a panko crusted oven-baked chicken breast and steamed broccoli. When my daughter, Claire sat down for dinner, she was all excited because she thought I had served macaroni and cheese... and then she realized it was rice. She wasn't overly impressed. As I was scraping her uneaten dinner into the garbage, I was mentally calculating the cost of the saffron I was chucking out.

Saffron Risotto

5 cups vegetable stock
2 tbsp butter
1/2 cup chopped onion
1 1/2 cup Arborio rice
1/2 cup dry white wine
1/2 tsp saffron threads
1/3 cup freshly grated Parmesan
salt and pepper to taste

1. Bring 5 cups of vegetable stock to a boil in a large pot, turn burner off. Remove 1/2 cup of hot stock to a small bowl and add saffron threads. Set aside to allow saffron to steep.

2. In a large non-stick skillet, sauté onion in 1 tbsp of butter. Add rice and stir around until coated. Add 1/2 cup of wine and stir and simmer until wine is absorbed. Start adding hot broth 1/2 cup at a time, waiting until liquid is fully absorbed before adding the next 1/2 cup. Continue until all broth has been absorbed by the rice (this entire process should not take more than 20 minutes).

3. Add the 1/2 cup of reserved broth with saffron (note: you can strain out the saffron threads or leave them in for added colour. I like to leave them in). Stir until this last 1/2 cup of liquid is absorbed.

4. Make ahead tip. You can prepare the risotto ahead of time, but leave the last 1 cup of liquid to be added when you are ready to serve the risotto. Turn the burner back on, add the last cup of liquid and stir until absorbed.

5. Right before serving stir in 1 tbsp butter and 1/3 cup Parmesan cheese.

Wednesday, April 25, 2007

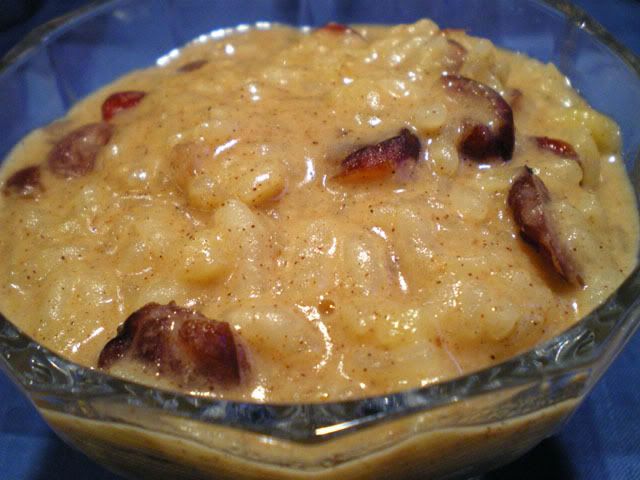
Cranberry Apple Dessert Risotto


I am in Toronto on business, but I whipped up a few new little recipes on the weekend, so I would have something to post while I'm away. I wouldn't want to disappoint my loyal blog readers (all six of you - and yes, I had to count my Mom and Dad separately to get to six!).

This recipe really appealed to me when I saw it for the first time. Dinner for dessert type dishes really appeal to me... dessert pizza, dessert sushi, dessert lasagna. OK I made that last one up, but I bet you could make one!

I started this recipe before dinner, then just put the pan back on the burner and added the last cup of liquid right before we were ready for dessert.

Cranberry Apple Dessert Risotto

1/2 cup dried cranberries
3 1/2 cups skim milk
1 tsp cinnamon
salt to taste
1 tbsp butter
1 large apple, peeled, cored and diced
1/2 cup Arborio rice
1 1/2 cups apple juice
2 tbsp packed brown sugar
1 tsp vanilla

1. In small bowl cover cranberries with boiling water for 30 minutes to plump.

2. Heat milk and cinnamon in saucepan. Set aside.

3. In a non stick skillet, heat butter and add apple to cook until tender (1 to 2 minutes).

4. Add rice and cook for 30 seconds.

5. Add 3/4 cup of apple juice and stir. When liquid is absorbed, add remaining apple juice and simmer until liquid is absorbed. Add sugar and stir well.

6. Begin adding hot milk, 1/2 cup at a time, stirring each addition until absorbed.

7. Stir in cranberries and vanilla. Serve with vanilla ice cream or whipped cream.

Tuesday, April 24, 2007

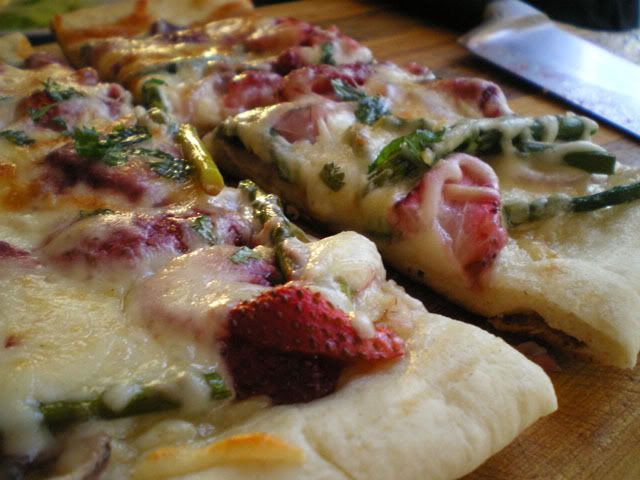
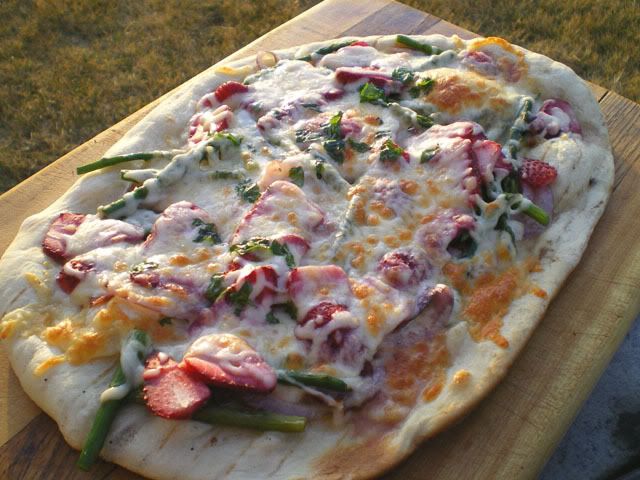
Asparagus and Strawberry Pizza


A few weeks ago, I was reading the food section of the Ottawa Citizen and they had a recipe for "Asparagus Strawberry Pizza". I thought that was a great idea, then I read further and realized that the recipe actually called for "Strawberry Tomatoes" (never heard of em, must be from the same family as Grape Tomatoes or Cherry Tomatoes?). I became stuck on the idea of an Asparagus Pizza with actual Strawberries, so I created my own. I also added some Proscuitto (because my husband balked at the idea of a pizza with no meat) and some sliced red onion.

I have decided that this recipe will also be my entry for this month's Monthly Mingle, "Spring is in the Air", hosted by Meeta at What's for Lunch Honey?.

We grilled our pizza on the charcoal BBQ. I'm not sure I would try this on a gas BBQ, the heat may be too high, and burn the bottom of the crust before the topping is even warmed up. So if you don't have a charcoal grill, put your pizzas in the oven on a cookie sheet at 475F for about 15 minutes.

I would also like to stick my tongue out at my friend Bill, who says that "fruit does not belong on a Pizza" :-P


Asparagus and Strawberry Pizza


Pizza Dough:
3/4 cup warm water
1 envelope active dry yeast
2 cups flour
1 tsp sugar
3/4 tsp salt
3 tbsp olive oil

Toppings:
1/4 cup olive oil
20 asparagus spears
1/2 large red onion, sliced
1 1/2 cup sliced fresh strawberries
4 slices proscuitto (about 2-3 oz)
2 cups cheese blend (I used mozarrella, provolone and Parmersan)
2 tbsp fresh cilantro, roughly chopped

1. Prepare Dough: dissolve yeast in 3/4 cup warm water for about 5 minutes. Mix dry ingredients. Add yeast mixture and oil to flour mixture. Mix until dough forms a ball. Turn out onto a floured surface and knead for 10 minutes. Cover and let rise for 1 hour (until double in bulk).

2. Punch down dough. Let rest for 10 minutes. Divide dough into two and roll out into two free form pizzas (about 13" by 8" each).

3. Prepare toppings: Cut off the asparagus tips (I only used the top 3"). Poach asparagus in simmering water for about 3 minutes. Drain. Sauté onion in a tiny bit of olive oil for 2-3 minutes until slightly soft. Add proscuitto to onion for the last 1 minute.

4. Place pizza dough directly on the grill. Brush with oil, and add onion, proscuitto, asparagus, strawberries and cheese. Sprinkle with cilantro. Close BBQ lid and grill for 10-15 minutes until toppings are bubbly hot. If you are doing this in the oven, you can go ahead and arrange all the toppings on top of the dough on cookie sheets before you put the pizzas in the oven.