Home Page

Thursday, March 25, 2010

Pistachio, Blue Cheese and Apricot Canapes


A delicious and super easy little canape recipe that I tried out for the first time on my family last weekend. This was the perfect thing for my kids because my daughter loves blue cheese and pistachios and my son loves apricots, so they pulled them all apart and split things up.

The contrast between the sweet honey and the apricots and the salty pistachios and the blue cheese was just divine. I'll be making these again the next time I have to bring an appetizer somewhere. They were super easy and I imagine they will travel well also.


Pistachio, Blue Cheese and Apricot Canapes

16-20 dried apricots
1/4 cup crumbled blue cheese
2 oz salted pistachios, shelled and chopped
1 tsp honey + more for drizzling.

1. In a bowl mix the blue cheese, chopped pistachios and 1 tsp of honey, until it forms a bit of a paste that can be shaped.

2. Use a tsp to form out little round mounds and place on on top of each apricot.

3. Arrange on a serving platter and drizzle with honey.


Thursday, March 18, 2010

Peanut Butter, Banana and Cinnamon Muffins


What this blog really really needs (other than a different author/cook) is yet another muffin recipe. I know, I know, I've made promises to myself to stop making muffins until I use up the dozens that are languishing at the bottom of my freezer, but I have a problem, OK? I should probably seek therapy. MUST. MAKE. MUFFINS. I can't stop.

But these are REALLY REALLY good. The only thing that might make these even better is a cup of semi sweet chocolate chips, a stroke of brilliance that didn't occur to me until the muffins were already in the oven. But, unfortunately I won't ever be able to try that, because I am hereby making a solemn promise to myself to stop making muffins! I mean it this time. Really! (Gosh, it's hard to type with your fingers crossed).


Peanut Butter Banana Muffins with Crumb Topping
Makes 15 large muffins (or if you prefer, 12 large and 6 mini muffins)

1 1/2 cups bran flakes cereal
1 1/2 cups milk
2 cups flour
2 tsp baking powder
1/4 tsp salt
1 tsp cinnamon
3/4 cup peanut butter
1/4 cup butter
1/2 cup brown sugar, packed
1 cup banana, mashed
1 egg, beaten
1 cup chopped dates (or nuts, or chocolate chips)

Crumb Topping
1/4 cup butter
1/4 cup brown sugar, packed
1/4 cup flour
1/4 tsp cinnamon

1. Stir together the milk and bran flakes and let stand for a few minutes.

2. In another bowl whisk together the dry ingredients (flour, baking powder, salt, and cinnamon).

3. Heat peanut butter and butter in microwave for 60 seconds. Pour into flour along with bran flake mixture and the banana, brown sugar and egg. Stir until just combined.

4. Mix in dates and spoon into prepared muffin tin.

5. Mix together all Crumb Topping ingredients until crumbly and divide amongst the muffins.

6. Bake at 400F for about 20 minutes or until the muffins pass the toothpick test.


Tuesday, March 9, 2010

Sourdough Pancakes


A few weeks ago I posted the recipe for my Sourdough Pizza Crust. This was more of an experiment than anything else. An experiment that went very well for a change. I've been working on a little project to develop a sourdough starter for about a month now, and I've baked with it a few times. Enough to know that I have a good starter going. In addition to the sourdough pizza crust, I've made sourdough cornbread, sourdough pancakes, sourdough crumpets, sourdough blueberry muffins, and a sourdough paperweight. All those recipes will be posted in good time - well except the paperweight recipe. Although, if anyone would like the recipe for a really heavy paperweight which can double as a brick to throw at your husband if he makes fun of your flopped bread, please just e-mail me for the recipe at:

madwomanattackshusbandwithunleavenedbread@crankypants.com

Anyway - I digress (as usual) - I thought I would share my sourdough pancake recipe today.

I've experimented with many different pancake recipes over the years. Sour Cream Pancakes, Pancakes with Beaten Egg Whites, Buckwheat Pancakes, Oatmeal Pancakes, Pancakes with all sorts of things added in, Pancakes from boxes, Pancakes from a can...

Until this past Saturday. My days of pancake experimentation are over. I will never ever be able to make pancakes again without making THIS recipe (unless I kill my starter, but that's another story). Before Saturday, my favorite pancake recipe has been one that I found in my Fanny Farmer Cookbook, where you separate the eggs, beat the egg whites and then fold them into the batter to make the pancakes extra fluffy.

But this recipe seriously blows that one away. On two fronts... it is way easier to make and it tastes better.

Here are the reviews of my family on these pancakes when asked which of my pancake recipes they like best:

Marco (6 years old): I don't know, do these ones have money in them? (In reference to the fact that I bake money into the pancakes every year on Shrove Tuesday).

Claire (10 years old): Yes, Mommy I love these ones best, can you buy me a new DS game?

Mario: I don't know, I think I need to try them all side by side to compare properly.(Seriously? OK, now where did I put that sourdough brick?)

Sourdough Pancakes

Before you go to bed:
1/2 cup sourdough starter
1/2 cup milk
1/2 cup warm water
1 1/4 cup flour

In the morning:
1 egg, beaten
1 tbsp sugar
3 tbsp melted butter
1/2 tsp baking soda
1/4 tsp salt

1. Before you go to bed, mix together the starter, milk, water and flour. Give it a good stir and let it sit on the counter overnight.

2. In the morning, add in the remaining ingredients. Stir.

3. Cook your pancakes as per usual.


That's it! This recipe made 12 fairly generous size pancakes (using a 1/4 cup ice cream scoop to drop the batter on the frying pan), plus one runt size pancake for the cook to eat on the sly.

Saturday, March 6, 2010

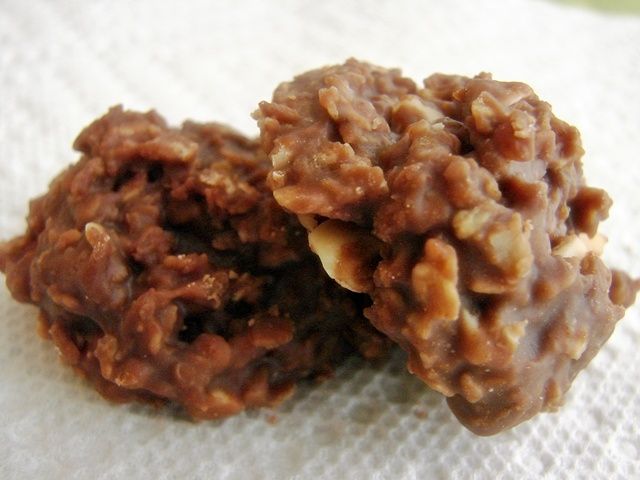
Chocolate Peanut Butter Mud Pies


I grew up eating mud pies. Yes, actual mud pies, like these ones: here.

My Mom's original mud pie recipe calls for coconut but my husband, Mario, really hates coconut. I've been promising for years to try making him a more palatable version of my classic mud pie. As you can see I promised as much back in October 2007 when I posted the original recipe... better late than never, right?

This version uses peanut butter instead of coconut. I also threw in some chopped peanuts hoping to give them some more "crunch". The peanuts (although really good) didn't add a lot of crunch, and so next time I am going to stir in some Rice Krispies at the end instead...that ought to be in about January of 2013 if you want to check back then...

Chocolate Peanut Butter Mud Pies

2 cups sugar
1/2 cup milk
1/2 cup cocoa
1/2 cup butter
pinch salt
1 cup peanut butter
1 tsp vanilla
3 cups oats (quick cooking)
1/2 cup chopped peanuts

1. In a saucepan, mix sugar, milk, butter, cocoa and salt. Bring to a boil, and cook for about one minute (stiring constantly).

2. Remove from heat and stir in the peanut butter and vanilla until melted and smooth.

3. Mix in the oats, and then the chopped peanuts. Let sit for about 10 minutes.

4. Drop by tablespoonfuls onto a parchment lined cookie sheet, and chill until set. Makes about 60 cookies. (or do like me and eat 12 and tell everyone it makes 4 dozen).


Wednesday, February 24, 2010

Chicken B'stilla


I adore Moroccan food. The smell that envelopes your house when you are cooking a Morrocan Tagine is, in my books, way up there with Glade Plug Ins, popcorn, and white glue! I also love the way so many Moroccan dishes incorporate dried fruits and nuts (two of my favourite food groups). I have recently invested in a real ceramic Tagine, and a couple of Moroccan cookbooks and I've experimented with some different types of salads, couscous, and stews. I haven't posted any of these recipes yet but I will (someday).

Both of my Moroccan cookbooks have recipes for Chicken B'stilla (pronounced Bisteeya). Everytime I flip through those books, I hang on those pages, drooling over the pictures, but despairing over how complicated (and caloric) the recipe seems. And so, I dog ear the page (again) for another time.

When I was in New Zealand on vacation over the holidays, I was happy to see there was a Moroccan restaurant in Rotorua. I went on-line and noticed that they had Chicken B'stilla on their menu. My heartrate went through the roof (hey, I get excited about food!). This was a perfect opportunity to taste this dish without having to slave over it all day, and without being able to go back for seconds (or fourths)...which I knew was going to be a serious risk...

Sadly, our travel companions weren't so fussy about the whole Moroccan food idea, and so I didn't get to go. I've been mourning that Chicken B'stilla ever since. There aren't too many Moroccan restaurants here in Ottawa, and to my knowledge, none serve Chicken B'stilla.

And so, when I noticed that the 2009 Holiday edition of the LCBO Food and Drink Magazine had a recipe for Chicken B'stilla, I new it was fate. I ran out right away and bought the ingredients before I could come to my senses. I even made one last ditch attempt to subvert my own plans. That morning at breakfast I asked my husband Mario, "so what would you like for dinner tonight, poached plain chicken breasts with boring steamed vegetables and dry boiled potates OR Chicken B'stilla?"

He answers (with conviction) Chicken B'Stilla! And then, "so what exactly IS Chicken B'stilla again?".

This is Chicken B'stilla.


Chicken B'stilla

(Note: the original recipe called for chicken with the skin on, and for 1/2 cup of butter, I used skinless chicken and cut the butter in half and the recipe did not suffer at all from these alterations. At least I don't think it did... I'd have to actually try it the original way to know for sure.... oh geez....)

2 tsp vegetable oil
4 chicken breasts
4 onions, finely chopped
1 tbsp garlic, finely chopped
1 tbsp ground cumin
2 tsp ground ginger
1 tsp ground cloves
1 tbsp ground cinnamon
1/4 tsp chili flakes
1/4 tsp turmeric
1 cup chicken stock
salt and pepper
3 eggs, beaten
1 cup dates, coarsely chopped
1/4 cup raisins
1/2 cup slivered almonds, toasted
9 sheets phyllo pastry
1/4 cup unsalted butter, melted (or more if you run out)
Icing sugar for garnish

1. In a large frying pan with a cover, heat vegetable oil and brown chicken breasts on both sides. Remove to a plate.

2. In the same pan add onions and cook about 10 minutes. Add garlic, cumin, ginger, cloves, cinnamon, chili flakes and turmeric. Stir for 30 seconds.

3. Place chicken back in pan with onion mixture and add the chicken stock. Cover with lid and simmer over low heat for 20 minutes, until chicken is cooked through.

4. Remove chicken from mixture and let cool. When cool enough to handle shred the meat into bite-size pieces.

5. Stir chicken back into the onion mixture and add eggs, dates, raisins, and almonds. Combine well and season to taste. (Steps 1-5 can be completed ahead of time).

6. Place one sheet of phyllo pastry horizontally on your work surface, brush lightly with melted butter.

7. Place a second sheet on top of this, vertically to form a plus sign (this is symbolic of the clothing sizes you will soon need if you eat to much of this). Brush with butter and place the third sheet diagonally, and so on until 8 sheets are used up. The eighth sheet does not need to be buttered, unless you are a rebel, in which case, I won't stand in your way.

8. Place the sheets in a greased 9-inch springform pan. Fill pastry with chicken mixture and spread out evenly. Enclose by pulling the overhanging pastry up and over the chicken. (Note: This is where I used that 9th sheet of phyllo. My eight sheets did not reach up far enough to fully enclose the filling, so I buttered that ninth sheet, folded it in quarters and placed it on top of the filling, before I folded my other eight sheets in.) Then brush the whole top with melted butter.


9. Bake the B'stilla for 50 minutes at 375F or until pastry is golden and chicken mixture is heated through.

10. Serve hot with sifted icing sugar overtop.


One other funny note. Before I assembled the B'stilla, I lined my springform pan with a circle of parchment paper (I didn't want to take any chances of sticking). When I was cutting the wedges for dinner, I forgot, and cut right through the parchment. So each person got a little triangle of parchment paper on their dinner plate underneath their B'stilla. When I was doing the dishes, I noticed that mine was the only plate that still the had paper on it! (I guess I've trained my family well not to complain about my cooking!!!)


"mmmmm.... parchment paper"


Sunday, February 21, 2010

Sourdough Pizza Crust


I have always loved baking bread. Nothing beats the satisfaction of seeing your bread rise, or the smell of bread baking in the oven. I usually bake two loaves at a time and then we eat toasted homebaked bread every Sunday morning for breakfast until its gone. Then I bake more, it's a viscious, kneady circle. Guffaw.

But we also love sourdough bread. LOVE. We eat a loaf a week (and that's in addition to the homemade white bread, and the countless bagels, raisin bread, rye bread, flatbread and sandwich bread that our carb-obsessed family goes through). We use the sourdough on the weekends to make yummy panini sandwiches for lunch, and then Mario will finish up the rest of the loaf, toasted with butter and molasses for his breakfast during the week. I usually just buy my sourdough from the bakery at the grocery store. But, lately I've been thinking (stand back)...if I can make my own regular bread? Why shouldn't I make my own sourdough?

So, I started to research sourdough starters. The first thing I noticed was how many different methods there are out there for getting a sourdough starter going. I am impatient, and I didn't want to devote two weeks to developping a starter that flopped and then have to start all over with a different method. So, I tried ALL the methods at once. That is how my kitchen came to be over run by little smelly, fermenting containers of sourdough starter.


(from left to right: Dudley, Cynthia, Barney, and Abigail)

These are my sourdough babies (not to be confused with sourpatch kids). I've been easily spending an hour each evening in the kitchen, mixing and feeding my little babies, tracking my actions and the reactions of the various potions like a mad scientist.

Guess what? They all took! Wow! I now have several very active and lively sourdough toddlers. And I can't decide which one to keep and which ones to give up for adoption! Seriously. These kids are going to eat me out of house and home! That is, if I can manage to keep them all alive (I don't have such a great track record with house plants...)

This pizza dough represents my first attempt at sourdough baking. For this recipe I used the sourdough starter that I named, "Abigail". Abigail was my firstborn and she holds a special place on top of my breadbox. Abigail was developped using equal parts plain white (unbleached) flour and bottled water. Everyday, I throw away all but 100g, and then feed her 50g flour and 50g water. Abigail was two weeks old, yesterday.

For a couple nights before I was going to make my pizza, I fed Abigail without dumping half (just to increase the volume of starter). On Saturday morning, I set aside 100g of Abigail to keep, in case she turns out to be "the one", and I fed the remaining portion again. When I noticed Abilgail had gotten all bubbly and foamy, I stirred her down, removed 1.5 cups and made the recipe below:

Sourdough Pizza Crust

1.5 cups active sourdough starter (300g by weight)
1 tbsp olive oil
1.5 cups flour (250g)
1 tsp salt

1. In the bowl of your stand mixer, mix the starter, flour, olive oil and salt until a nice soft dough forms. Depending on the consistency of your starter, you might need to add a little warm water, or a little more flour. Mine seemed good.

2. Knead your dough (either by hand or in the stand mixer) for about 10 minutes.

3. Set the dough in a greased bowl, cover the bowl with plastic wrap and a tea towel and set in a warmish spot (I like to let my dough rise on top of the PVR, it gets nice and warm there). My dough took about 6 hours to double in bulk (sourdough rises a lot slower than breads leavened with commercial yeast).
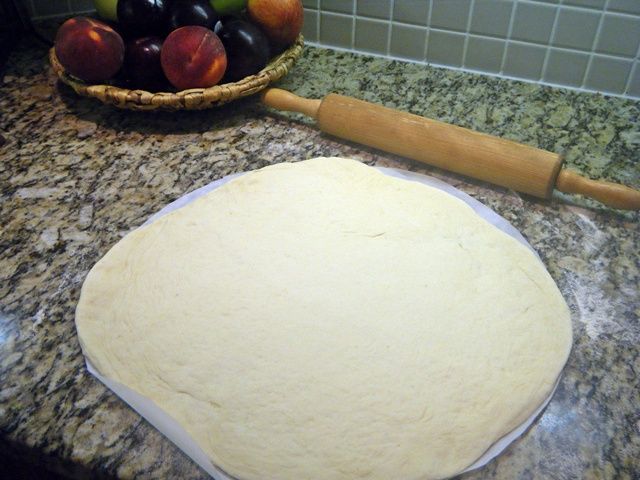

4. Punch the dough down, and let it rest for about 10 minutes. Roll or pat the dough out to your desired pizza size/shape. I preheated my oven to 450F with the pizza stone inside and rolled my dough out on a piece of parchment paper dusted with cornmeal. Then, I just slid the parchment right onto the pizza stone in the hot oven.

5. I prebaked the crust for 5 minutes and then pulled out the pizza stone and topped it with your favorite toppings. Then I returned it to the oven for 15 more minutes.


This was my dough, after the 5 minute "pre-bake".

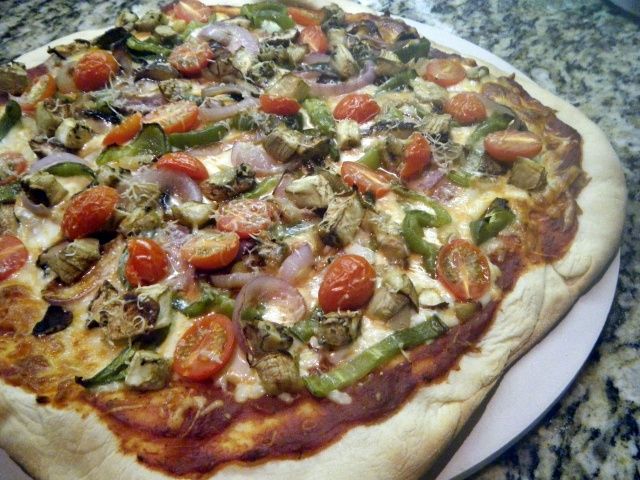
Although not really relevant to this post, for anyone who is curious, the toppings on my pizza were: canned pizza sauce, mozzarella, pre-roasted vegetables (green pepper, onion, eggplant and garlic), halved grape tomatoes and parmesan cheese. Claire and Marco suggested that next time, I make the pizza EXACTLY the same, only add pepperoni and leave out the green pepper, onion, eggplant, tomatoes and garlic. So, in other words, pepperoni pizza, please.

Next weekend, I am going to try baking a loaf of classic sourdough bread using one of the other starters... right now I'm off to water my plants, the leaves are looking a little crispy...

Thursday, February 18, 2010

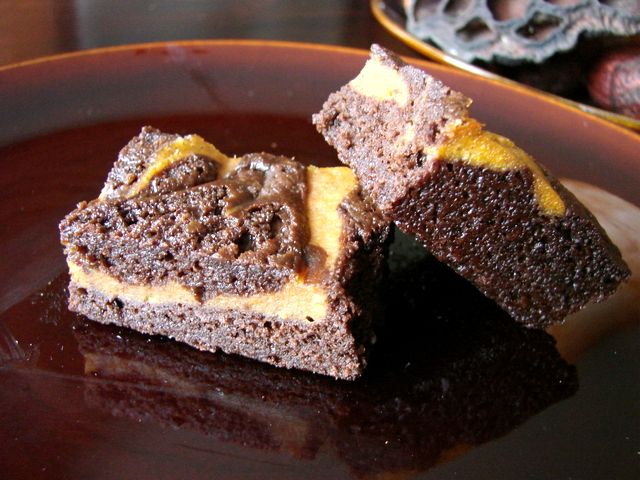
Pumpkin Swirl Brownies


My most excellent place of employment recently went through an exercise to upgrade all of its employee workstations. I had forgotten about this until I noticed an appointment in my calendar for somebody from our IT department to come and take my old computer away and install a new one. What ensued was a mad scramble to rid my existing hard drive of anything and everything incriminating personal. I had a LOT of junk on there. But some of it wasn't junk, like this picture that I found of these Pumpkin Swirl Brownies that I made back in the fall and then completely forgot about.

So then I transfered the picture on to one of those little USB thingers, and forgot about THAT instead.

But yesterday, I was sitting in a meeting, and I remembered it! Can't remember the meeting very well though...

So here is the recipe. It was truly fabulous. These brownies were moist and rich and melt in your mouth (see no memory problems there!). I even remember where I got the recipe from: LCBO Food and Drink

One thing I really CANNOT remember, though, is how many of these little suckers I ate. So it must have been only one. Yeah. I'm sure it was only one!

Pumpking Swirl Brownies

Pumpkin Swirl
1 oz cream cheese, room temperature
1/4 cup sugar
1/2 cup mashed pumpkin
1 large egg
2 tbsp flour
1/4 tsp vanilla extract
1/4 tsp cinnamon

Brownie
6 oz bittersweet chocolate, chopped
3 tbsp butter
1/2 cup sugar
2 tsp vanilla extract
2 large eggs
1/2 cup pastry flour
1/2 tsp baking powder
1/4 tsp salt

1. Preheat oven to 350F and grease an 8x8 inch square baking dish.

2. For pumpkin swirl, stir together the cream cheese and sugar. Add pumpkin and beat well. Blend in egg, pastry flour, vanilla and cinnamon. Set aside.

3. For brownies, place chocolate and butter in double boiler and stir until melted.

4. Remove from heat and stir in sugar, then vanilla, and then the eggs one at a time. Stir in flour, baking powder and salt.

5. Scrape half of batter into baking dish and spread evenly. Drop spoonfuls of pumpkin filling onto brownie batter and then drop remaining brownie batter around pumpkin. Swirl filling with tip of a knife and bake for about 30 minutes, until a toothpick inserted into the center of the brownie comes out clean.

6. Cool at room temperature before slicing (makes 16 square or 20 smaller rectangular brownies).