
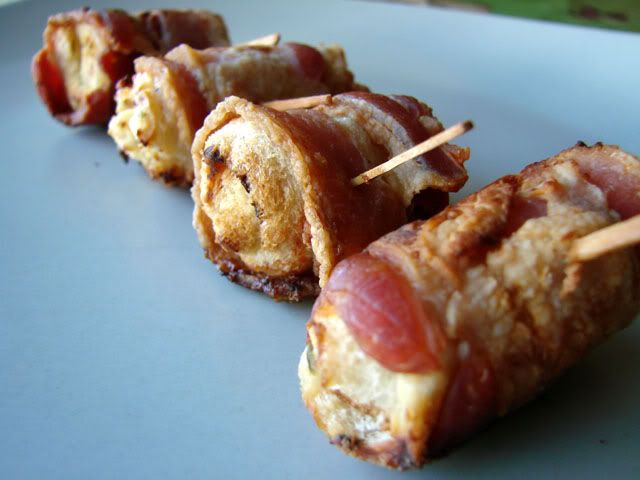
Bacon and Cream Cheese Roll-Ups
This recipe is a long time favorite of ours (and our friends). I made these most recently for a party that we hosted on Halloween. One of my friends specifically requested that I make "the bacon things" for the party... and they go pretty fast!
We actually had a little discussion about how you could pretty much wrap ANYTHING in bacon and improve on it! Then, much to the dismay of my guests, I happened to mention that, as many times as I have made these appetizers, I have never actually sampled one. They just seem a little "dangerous" to me.... I think they would be "more-ish".
People who know me well, know that I don't do things well in moderation, I have an ALL or NOTHING kind of mentality. I compare this to the day that I first tasted Poutine... I probably should have never had that first bite, because then I wouldn't know what I was missing everytime I walk past the chip wagon that parks itself right outside my office building (solely to taunt me, I know). Ask me if I have EVER ordered a "small" poutine.... yeah, I rest my case.
Bacon and Cream Cheese Roll-Ups
1/2 loaf white sandwich bread (square slices are best)
1 8oz package of cream cheese, softened
1 clove garlic minced
1 tsp italian seasoning blend
1 tsp dried parsley flakes
1/8 tsp pepper
1 lb bacon
1. Mix together the cream cheese, garlic, seasoning, parsley and pepper until well blended.
2. Cut the bacon slices in half.
3. Cut the crusts off the bread, and spread each slice evenly with cream cheese (I use about a heaping tablespoon per slice, then cut each slice of bread into 3 strips.
4. Roll up each strip of bread and wrap with 1/2 slice of bacon. Secure with a toothpick. I usually just keep going until I run out of bacon. This usually takes about 1/2 a loaf the bread and most of the cream cheese mixture. If you have leftover cream cheese, it is great spread on crackers or toasted bagels.
5. At this point, you can go ahead and bake them, or you can stash them in the fridge or the freezer to bake later (if baking from frozen, add about 5-10 minutes to your cooking time).
6. Bake at 375F for 15-20 minutes until the bacon is crisp. Drain on paper towels for about 5 minutes to cool a bit, and serve.
7. Get out of the way quickly, so you don't get trampled.


