Home Page

Friday, November 28, 2008

Old Fashioned Cake Doughnuts


Nothing beats homemade doughnuts. Well, that is nothing except for Muskoka Cookies, Peach Squares, Peanut Butter Chocolate Cake, Butter Tart Squares, Fresno Pudding, and Chocolate Banana Cake. Not my Haupia though, joking aside, please don't ever make my Haupia, make somebody else's Haupia.

(Note: I hope everyone CLICKED on all those links! That's why I put them there people! And I can check, you know - well I think I can, anyway, well maybe not... I mean I'm sure I could if I was at all technology savvy, but I should probably just stick to cooking.... and rambling, I'm good at that - the rambling that is.)

OK, so where was I? Doughnuts. Right.


So the doughnuts are yummy.

You can either douse them in cinnamon sugar or icing sugar. I always keep a spice bottle in my cupboard filled with cinnamon sugar that I make with 3 parts sugar to 1 part cinnamon (for anybody who might be fractionally challenged that means I would add 1 tablespoon of cinnamon to 3 tablespoons of sugar). This is great to have on hand to sprinkle on toast. I used the whole bottle on these doughnuts.

These are best served still warm.

Old-Fashioned Cake Doughnuts

1 cup sugar
4 tsp baking powder
1 1/2 tsp salt
1/2 tsp nutmeg
2 eggs
1/4 cup butter, melted
1 cup milk
4 cups flour (plus a little more if dough is sticky)
oil for frying (lots)
Cinnamon Sugar (tons)

1. In a large bowl mix the sugar, baking powder, salt and nutmeg.

2. Add eggs, milk and melted butter. Beat well.

3. Add 3 cups of the flour, beating until blended. Add one more cup of flour and beat well. The dough should be soft and sticky but firm enough to handle. If you feel its necessary, add up to 1/2 cup more flour.

4. Cover with plastic wrap and chill for one hour (I once got a question from a reader as to whether when I said "chill" I meant in the refrigerator... um yes that's what I meant, but I can see how this could be confusing, I could have meant "Like OK, cover with plastic wrap, and then um like chill, ya know on the couch, for like an hour... like OK?")

5. After you're done chilling on the couch, remove your dough from the fridge and begin heating about 1" of oil to 360F in a large metal skillet. I actually don't have one of those fancy schmancy candy thermometres (hello Santa are you reading?)... somebody remember to ask me after Christmas how many candy thermometres I get...

6. Working half the dough at a time, roll it out on a floured surface to about 1/2" thickness. Cut out circles using a doughnut cutter. If you don't have a doughnut cutter (Santa?) then use a regular cookie cutter and cut out the hole with the screw cap off a 40oz bottle of Newfoundland Screech.

7. Decide that you are too cool for school and take a big swig of the Screech for no good reason. Once the burning subsides and you stop crying and sputtering, push the scraps of dough back together, re-roll and repeat steps 6 through 7 over and over until (a) all the dough is used up or (b) you pass out.*

8. Gently drop the doughnuts in batches into the hot oil. Flip them over as they puff and turn them a couple more times as they cook. They will take 3-4 minutes in total and they will be lovely and golden brown all over.

9. Remove from the oil and set them on paper towels (that removes all the fat, you know). Sprinkle generously with cinnamon sugar. Enjoy them hot, and eat at least four, you need some carbs in your belly to soak up all that Screech.


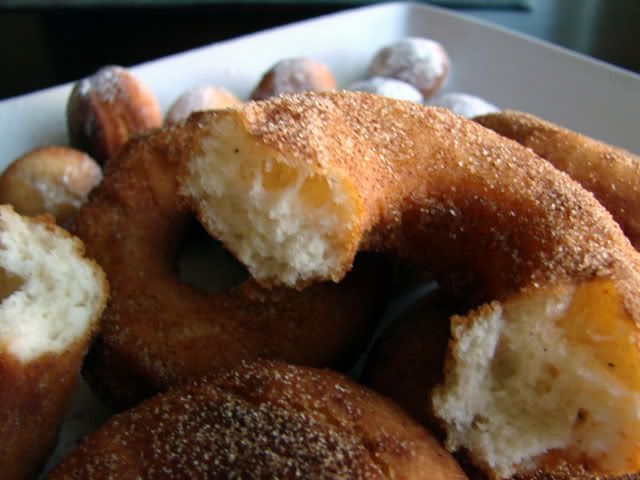
*Janet is Hungry will not be responsible for any mishap (foreseeable or unforeseeable) that may arise as a result of drinking alcohol in close proximity to a pan of hot oil.

Tuesday, November 18, 2008

Bacon and Cream Cheese Roll-Ups


This recipe is a long time favorite of ours (and our friends). I made these most recently for a party that we hosted on Halloween. One of my friends specifically requested that I make "the bacon things" for the party... and they go pretty fast!

We actually had a little discussion about how you could pretty much wrap ANYTHING in bacon and improve on it! Then, much to the dismay of my guests, I happened to mention that, as many times as I have made these appetizers, I have never actually sampled one. They just seem a little "dangerous" to me.... I think they would be "more-ish".

People who know me well, know that I don't do things well in moderation, I have an ALL or NOTHING kind of mentality. I compare this to the day that I first tasted Poutine... I probably should have never had that first bite, because then I wouldn't know what I was missing everytime I walk past the chip wagon that parks itself right outside my office building (solely to taunt me, I know). Ask me if I have EVER ordered a "small" poutine.... yeah, I rest my case.


Bacon and Cream Cheese Roll-Ups

1/2 loaf white sandwich bread (square slices are best)
1 8oz package of cream cheese, softened
1 clove garlic minced
1 tsp italian seasoning blend
1 tsp dried parsley flakes
1/8 tsp pepper
1 lb bacon

1. Mix together the cream cheese, garlic, seasoning, parsley and pepper until well blended.

2. Cut the bacon slices in half.

3. Cut the crusts off the bread, and spread each slice evenly with cream cheese (I use about a heaping tablespoon per slice, then cut each slice of bread into 3 strips.

4. Roll up each strip of bread and wrap with 1/2 slice of bacon. Secure with a toothpick. I usually just keep going until I run out of bacon. This usually takes about 1/2 a loaf the bread and most of the cream cheese mixture. If you have leftover cream cheese, it is great spread on crackers or toasted bagels.

5. At this point, you can go ahead and bake them, or you can stash them in the fridge or the freezer to bake later (if baking from frozen, add about 5-10 minutes to your cooking time).

6. Bake at 375F for 15-20 minutes until the bacon is crisp. Drain on paper towels for about 5 minutes to cool a bit, and serve.

7. Get out of the way quickly, so you don't get trampled.


Tuesday, November 11, 2008

Pumpkin and Raisin Spice Muffins


If you are anything at all like me, at some point in mid to late September when you walk into the grocery store and notice the huge display of halloween pumpkins, your heart skips a beat. Starting then, and for the next six weeks or so, you start buying pumpkins like they are going out of style (and frankly they ARE going out of style - on November 1, to be precise).

Then, sometime around now in mid November, you open the freezer to find room for some of your early Christmas baking, and you realize that you have a "type-M" personality. That is "M" for "Messed Up". You really aren't capable of doing ANYTHING in moderation. There is enough frozen pumpkin puree in your freezer to last a lifetime.

If I just described you (yes, I know that is highly unlikely but just humour me, OK?)... it's alright! I'm here to help! Because there are TONS of things you can do with frozen pumpkin puree. Just the other night, I made Pumpkin Risotto for dinner (it was too dark to get good pictures). And I always make at least one batch of my Pumpkin Soup. Of course you can never get enough Roasted Pumpkin Seeds. Another thing I love to do, is stir about a half cup of pumpkin puree into my morning oatmeal with a little bit of pumpkin pie spice and molasses.

These muffins are another favorite way to use up the puree. I got the original recipe from Farmgirl Fare's Blog. They are fabulous with Pecans or Walnuts instead of the dates, but I have stopped putting nuts in any of my muffin recipes, because the school Claire and Marco go to has a "no nut" policy (there is a good joke there, but I try not to make fun of my kids on the blog!)

OK, I have to run... I need to go find room in the freezer for these muffins....YIKES!


Pumpkin and Raisin Spice Muffins

1 cup raisins
3/4 cup orange juice
3 cups white flour
1/2 cups whole wheat flour
2 tsp baking soda
1 tsp baking powder
1 tsp salt
2 1/2 tsp pumpkin pie spice
1 cup butter, melted
1 cup brown sugar, packed
1/2 cup honey
3 eggs
450g pumpkin puree (or one 15oz can)
1 cup chopped dates (or more raisins, dried cranberries, or nuts)

1. Microwave raisins with orange juice for 2 minutes on high, and set aside.

2. Whisk together dry ingredients: flours, baking soda, baking powder, salt and spices.

3. In another bowl mix butter, brown sugar, honey, eggs and pumpkin puree.

4. Add the wet ingredients to the dry along with the raisins and orange juice. Mix just until incorporated. Stir in dates.

5. Fill muffin tins almost to the top (makes about 18 large muffins) and bake at 350F for about 25 minutes.


Sunday, November 2, 2008

Peanut Butter Chocolate Cake


This year for Claire's 9th birthday, I told her that I would bake her ANY kind of cake she could dream up... Claire is lucky she didn't ask for anything too complicated, it could have been a major flop.... but baking an "invented cake" was fun.

Claire was quite precise, she wanted a chocolate cake with peanut butter in the middle and chocolate on top and then crushed Oreo cookies on top of that.

I thought I could improve slightly on Claire's inspiration. I made a four layer cake with peanut butter cream cheese icing with a chocolate-peanut butter ganache and crushed Pirate cookies on top. (Note: Pirate cookies are a peanut butter cream filled cookie made by Christie... you can probably find an equivalent, if you can't find Pirate's).

This cake was "oh-my-god-good".


This post is really more about the filling and icings, than the cake itself... because I cheated and used a Duncan Hines Devil's Food chocolate cake mix as the base and concentrated on making the icing really good. You know icing is good when you purposefully decide the cake has enough when there's still a half cup in the bowl (which you cannot let go to waste). So you sneak out of the kitchen with the bowl and a rubber scraper and come back three minutes later and yell to the kids, "who wants to lick the bowl?". They come running over, and peer hopefully into the bowl in which you've managed to leave one or two small streaks of icing!!

I knew that for a family of four, we'd be eating this cake for a week if I made a whole one, so I cooked the cake mix in two 9x9 inch square pans. I froze one for later. That way I was able to make a four layer rectangular shaped cake that I could slice like a loaf of bread. The cake made 8 slices (4 each for two nights) and the pieces were frankly WAY too big (although strangely that didn't stop me from cutting the exact same size pieces the second night). The cake was so rich, I probably should have sliced it into 10 or even 12 pieces.

Chocolate Peanut Butter Cake

1 package chocolate cake mix (prepared according to package directions)
8 pirate cookies, (6 to crush in food processor for decorating, and 2 to eat)

Peanut Butter Cream Cheese Icing
10oz cream cheese, softened
1/2 cup butter, softened
5 cups icing sugar
1 cup smooth peanut butter

Chocolate Peanut Butter Ganache
4oz semi sweet chocolate, roughly chopped
2 tbsp smooth peanut butter
1 tbsp corn syrup
1/4 cup heavy cream

1. Make cake according to package directions in two 9x9 inch loaf pans. Let cool completely. Wrap and freeze one cake (otherwise, double the icing and ganache and make a whole cake - square or round).

2. Slice the remaining cake in half. And then slice each of the two rectangles into two layers, so that you have four rectangular shaped layers.

3. To make the icing, in a mixing bowl beat together the cream cheese and the butter until creamy. Add the icing sugar about 1 cup at a time, beating between each addition. Stir in the peanut butter. Taste. Sigh.

4. Place the first cake layer down on your chosen cake plate. Spread a layer of icing (Sorry, didn't measure how much I put between each layer), but make it about 1/4 inch thick, there's lots of icing, so you don't need to worry about running out. Repeat with the next layer, and then again with the third layer. Place the last layer on top and then frost the entire cake with the remaining icing. (Note: if you are lucky, you will have about 1/2 cup of icing left over - tee hee)

5. Chill the cake while you are making the ganache. Melt the semi-sweet chocolate in a double boiler and stir in the cream, peanut butter and corn syrup. Let cool a few minutes, but not too much, it should still be pourable.

6. Pour the ganache over the cake and spread slightly with an icing knife to encourage it to drip down over the sides a bit.

7. While the ganache is still wet, sprinkle the cake with crushed Pirate Cookies.

8. Chill until ready to serve.